We have some specific guidelines on how to tag your items. Following our methodology gives your items a greater chance of selling, which means a big check for you!
This page will give you instructions on how
to use our online barcode system to enter your items, print tags, and then specific ways to tag your item.
In general, how does this work?
1.
Organize Items: To make entry into the computer much quicker, ensure that your items are organized in a way that makes sense to you.
2.
Item Entry: Each item must have a unique barcode assigned to it. This barcode ensures you get credit for when your item is sold.
3.
Print Barcodes: After you enter your items into our system, you'll print the barcode on cardstock and cut them apart.
4.
Attach Tag: The individual tag should be attached to the corresponding item.
Preparing for Item Entry
It is best to organize your items in some fashion so that it will help the entry process go faster. You can choose the option that makes the most sense to you, but a suggestion could be to enter all girls clothes, boys clothes, girls shoes, boys shoes, toys, baby equipment, and then furniture.
Again, it is completely up to you on how you enter the items in, but organization really helps!
Choosing a Tag Type
All items must be tagged with an individual, unique, barcode. Before we explain how to enter your items, we want to let you know about the two different types of tag options so you can choose which one works best for you.
Option 1: Detailed Tags (Most Popular/Recommended)
A detailed tag requires you to enter information about the item on your computer. You'll enter details such as description, size, brand, color, etc. You can track each item individually, and when a detailed
tag is sold during a sale, you can see which specific items were sold. Detailed tags are the most popular option for our consignors, because you can track your sold items.
Option 2: Express Tags
The express tag is a quick way for you to tag your items, but it does require some manual work. You must hand-write the description on each tag. While we can tell you a summary of your sold items, we are unable to show you online which items are specifically sold during a sale.
It is completely up to you which tag option you choose, but we highly recommend using detailed tags.
Entering Tags
To enter your tags, login to your consignment account. Choose "My Items" from the menu bar, and then choose "
Add Items". You will be prompted to make a decision on the type of tag you would like to create.
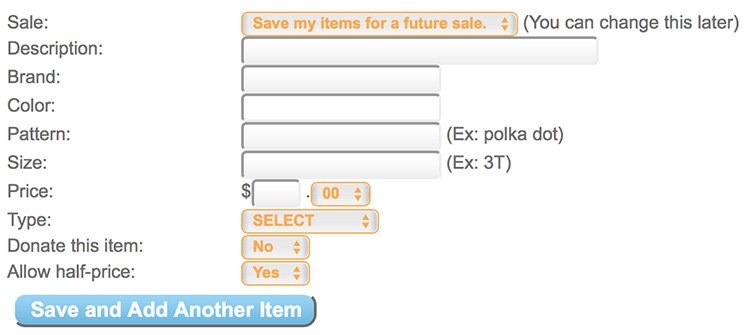
Detailed Tags
You'll be prompted to enter information for each item. Here is an example of what the item entry screen looks like. You are not required to provide every field, although description and price are required.
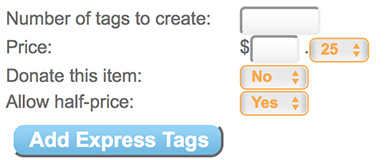
Express Tags
The process for generating express tags is a little different than for detailed tags. You will need to decide how many tags you need and the price for each tag. For example, you may decide you want 5 tags for $5.50. Here is an example of the entry screen:
Voice Tag Entry
When visiting our website from a
mobile device, our system will use your cell phone or tablet's microphone to understand what
you're saying and translate it to text. If you're not sure what the microphone
button looks like on your device, here is an example for
iPhone/iPad and
Android.
The system needs you to be very specific so we know where to put the information about your item. To help classify your item correctly, our system will be looking for several key words:
BRAND, COLOR, PATTERN, SIZE, PRICE, DONATE, AND HALF PRICE. What you say after each of these key words helps us get your item entered.
Here is an example of something you could say (Bold/Italics just for emphasis):
- Sun dress BRAND babyGap COLOR green PATTERN polka dot SIZE 3t PRICE three dollars and fifty cents DONATE yes HALF PRICE no
You don't have to use all the key words in order to get your items entered. Here are more examples:
- Boy Polo PRICE four dollars
- Girl shoes PRICE eight dollars and twenty five cents DONATE yes
Other Things to Remember:
- Your description should ALWAYS go first, followed by the other key words.
- You MUST say all the words for the price. For example: Eight dollars and twenty five cents.
- We can even correct some common typing issues--for example: if your phone types
"genes", we'll convert it to "jeans" for you.
Printing Tags
It is absolutely critical to print your tags on
WHITE cardstock. Colored cardstock can be yard to read and does not scan as easily during checkout. Once you print your tags, use scissors to cut each tag as indicated by the lines on the print out.
Sample Detailed Tag
To illustrate what a single detailed tag looks like, take a look at the example below. The tag has several pieces of key information on it.
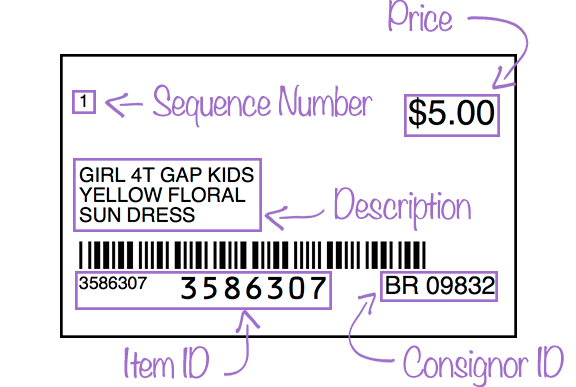 Sequence Number: Each time you print a set of tags, there will be a sequence number on each tag. Each time you print, this sequence number begins with the number 1. This number helps you keep your tags in order after you've cut them out. For example: If you kept your items in order as you entered them, the first tag should be attached to your first item, and so forth. The sequence number helps you get the cards back in order in case you happen to play a game of 52 card pick up with your tags. :)
Price: This is the sale price for the item. If you choose to change your price, you MUST change it online and print a NEW tag. This is very important. Simply hand writing a price change does NOT change it in our system.
Description: The item description information you enter in during the pricing process will here when the tag is printed. For spaces reasons, we may not be able to print every word, so this is the important set of information.
Item ID: Every item is associated with a UNIQUE item ID and this is how we ensure YOU get paid when an item is sold, so please make sure EVERY item you bring to our sale has an item ID associated with it.
Consignor ID: This information is very important for sorting and ensuring your items are returned to you for pickup.
Donate and Half Price: In this example, there is NOT a dot on this tag, which indicates the item could be sold for half price. Also, there is NOT a "D" for "Donate" which means this item will be sorted and returned to the consignor during pickup.
Sequence Number: Each time you print a set of tags, there will be a sequence number on each tag. Each time you print, this sequence number begins with the number 1. This number helps you keep your tags in order after you've cut them out. For example: If you kept your items in order as you entered them, the first tag should be attached to your first item, and so forth. The sequence number helps you get the cards back in order in case you happen to play a game of 52 card pick up with your tags. :)
Price: This is the sale price for the item. If you choose to change your price, you MUST change it online and print a NEW tag. This is very important. Simply hand writing a price change does NOT change it in our system.
Description: The item description information you enter in during the pricing process will here when the tag is printed. For spaces reasons, we may not be able to print every word, so this is the important set of information.
Item ID: Every item is associated with a UNIQUE item ID and this is how we ensure YOU get paid when an item is sold, so please make sure EVERY item you bring to our sale has an item ID associated with it.
Consignor ID: This information is very important for sorting and ensuring your items are returned to you for pickup.
Donate and Half Price: In this example, there is NOT a dot on this tag, which indicates the item could be sold for half price. Also, there is NOT a "D" for "Donate" which means this item will be sorted and returned to the consignor during pickup.
Do I need hangers, and if so, how do I hang clothing?
Yes, most clothing is placed out for sale on hangers similar to the way it is displayed in a traditional retail store. Consignors are responsible for providing hangers and those hangers stay with the clothing item.
All hooks on the hangers should be turned to the left so the hook looks like a question mark when facing you. Place your barcode tag on the
RIGHT SIDE of the garment. This places the tag on the outside of the rack for shoppers to easily see.
Here are a few pointers to consider:
Use only one hanger for two piece outfits.
Hang the shirt first, then turn the hanger over and pin the waist of the pants to the back of the shirt at the shoulder seams.
Do not pin second pieces (pants or skirts) under jackets or shirts. They cannot be seen if you do this, so the garment is less likely to sell.
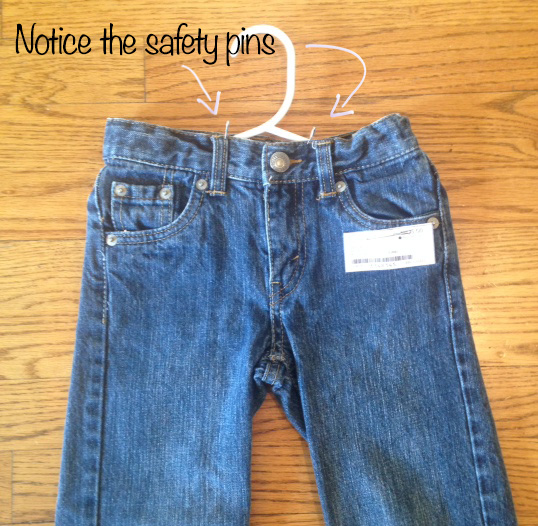
Pin pants with two safety pins at the waist. One safety pin will go on each side of the hanger's hook to keep the pants on the hanger. This allows the pants to be fully seen and keeps them from falling on the floor.
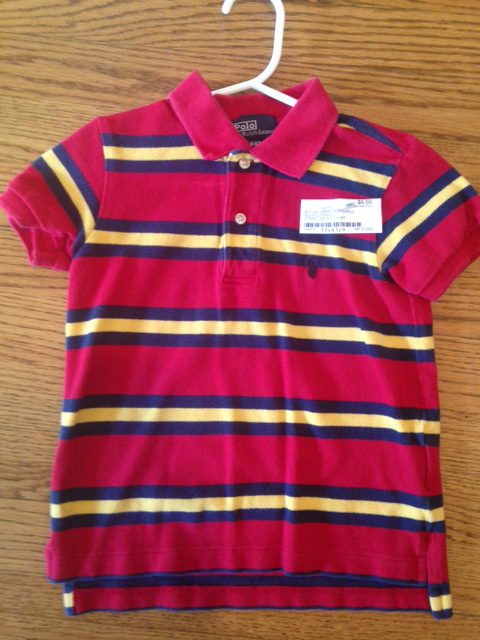
Examples of Hanging and Tagging
If the instructions above about hanging and tagging are confusing, don't worry. Here are a couple visuals to help.
How should I tag my shoes?
Here are a few tips to help you with tagging shoes. Following these instructions will help us sell your items, even if the barcode tag becomes separated from the shoes.
Punch a hole in the barcode tag.
Connect the two shoes, and the barcode tag, together by tying the shoe strings, using ribbon, cable ties, or twist ties.
Place a piece of masking tape on the bottom of each shoe with the ITEM ID. DO NOT use gummy tape like Duct Tape! The item ID is the number below the barcode on the tag. This is very important!
How should I tag toys, baby equipment, and decor items?
Some items take a bit of creative thinking in order to fix the barcode to the item. However, in general, we suggest using zip ties and/or clear carton tape to affix the tag
to the object. If you use carton tape, be careful to attach the tag in a way that it does not remove paint from the item when the tag is removed by the buyer.
An example of how to tag: If you have a toy car, punch a hole in the barcode tag, then use a cable tie to attach the tag to the steering wheel.